
Posing for Wedding Photographers
by Michael Anthony
Download Michael's Free Posing Guide for Couples by Clicking Here
Any photographer will tell you that wedding photography is an art. It combines various types of photography and makes them into a single type. Our job as wedding photographers is to capture meaningful moments that allow our clients to recall their special day for the rest of their lives.
One of the most challenging art forms to master is posing, typically done after lighting technique and compositional rules. This is because to create a good pose. You have to follow a set of entirely different rules for males, females, couples, and groups.
Many posing guides for adults can be found on the web or in books but tend to emphasize recreating a specific set of poses. The problem is that all poses have to be designed to accommodate the shape, apparel, light, composition, and environment of the subject. You can understand posing by understanding its basic principles and breaking it down further for different situations. Just like with composition, it's broken down into a set of rules and ideologies.
The first rule of posing is that communication is essential.
An essential concept to take away from this article is that posing is foremost about communicating with a viewer. Because an expression is so simple, people are moved to laugh or cry by a photograph.
It may sound cliché, but for a proper understanding of how posing is about communication, consider how music influences the viewer's emotions in a sequence. This same logic applies to a pose as well. A specific element changes how an image is communicated.
As an artist, your most substantial element to creating a complete image will be the pose. For that reason, I plan to show you some of the rules and ideologies through this multipart series.
Posing the Female Form
As weddings typically offer a great deal of bridal photography, we will begin here. However, the ideas that we will discuss can be applied to all women in many aspects. To learn how to pose a subject, we'll take a look at each step one step at a time. Before arranging your subject, we need to consider a couple of things.
Light Direction
Getting a true sense of your photographic light source is essential, even when photographing in the open shade: there will be a direction of light. You need to learn to determine the direction and place your subject to get the right kind of light for your shot in addition to the right pose. Remember the type of light you have and how best to use it so you get the most flattering light. For example, complex light sources will not always be the best way to place on your subject's face. You can utilize spotlights and off-camera flash to create just the right effect.
Composition and Background
These are essential considerations to keep the picture free of distractions. A photo's posture should also reflect the mood of the picture. The two couples should not be looking into the camera or the light source if the subject is in a dramatic, slightly underexposed scene. This wouldn't communicate the story well.
A General rule for Women is to Emphasize Shape and Curves
When I begin a foundation for a great pose, there needs to be an understanding that the goal for posing women is to emphasize what we call the S-curve. Each time that woman is positioned into a pose, the main goal is to exaggerate her natural shape in the image because it will be attractive to the eye. Just as I stated above, you can see how it will tie into the composition, and light will bring my emphasis on her shape and curves.
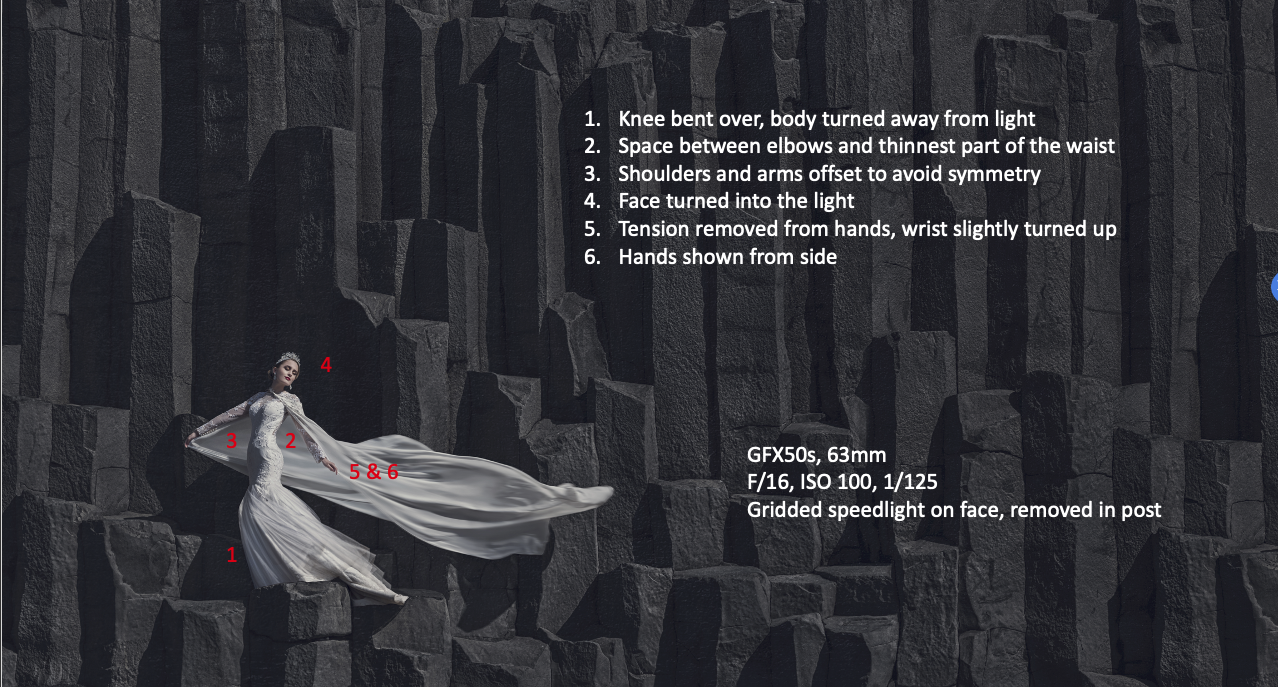
Begin with Turning the Body Away from the Light
To start, you will need to turn the body away from the light source. You may know about this technique, but let me talk about why this is done. When you place a body away from the light, it will create a shadow to carve a shape into the body as well as letting the light that falls on her to create texture while leaving the broad side of her body in shadow and the short side of her body in the light. So when the light falls on her, it ends up with a dimension in her curves and body that can make her look thinner at the same time. This technique can also be used on slim women because the dimension will emphasize her curves.
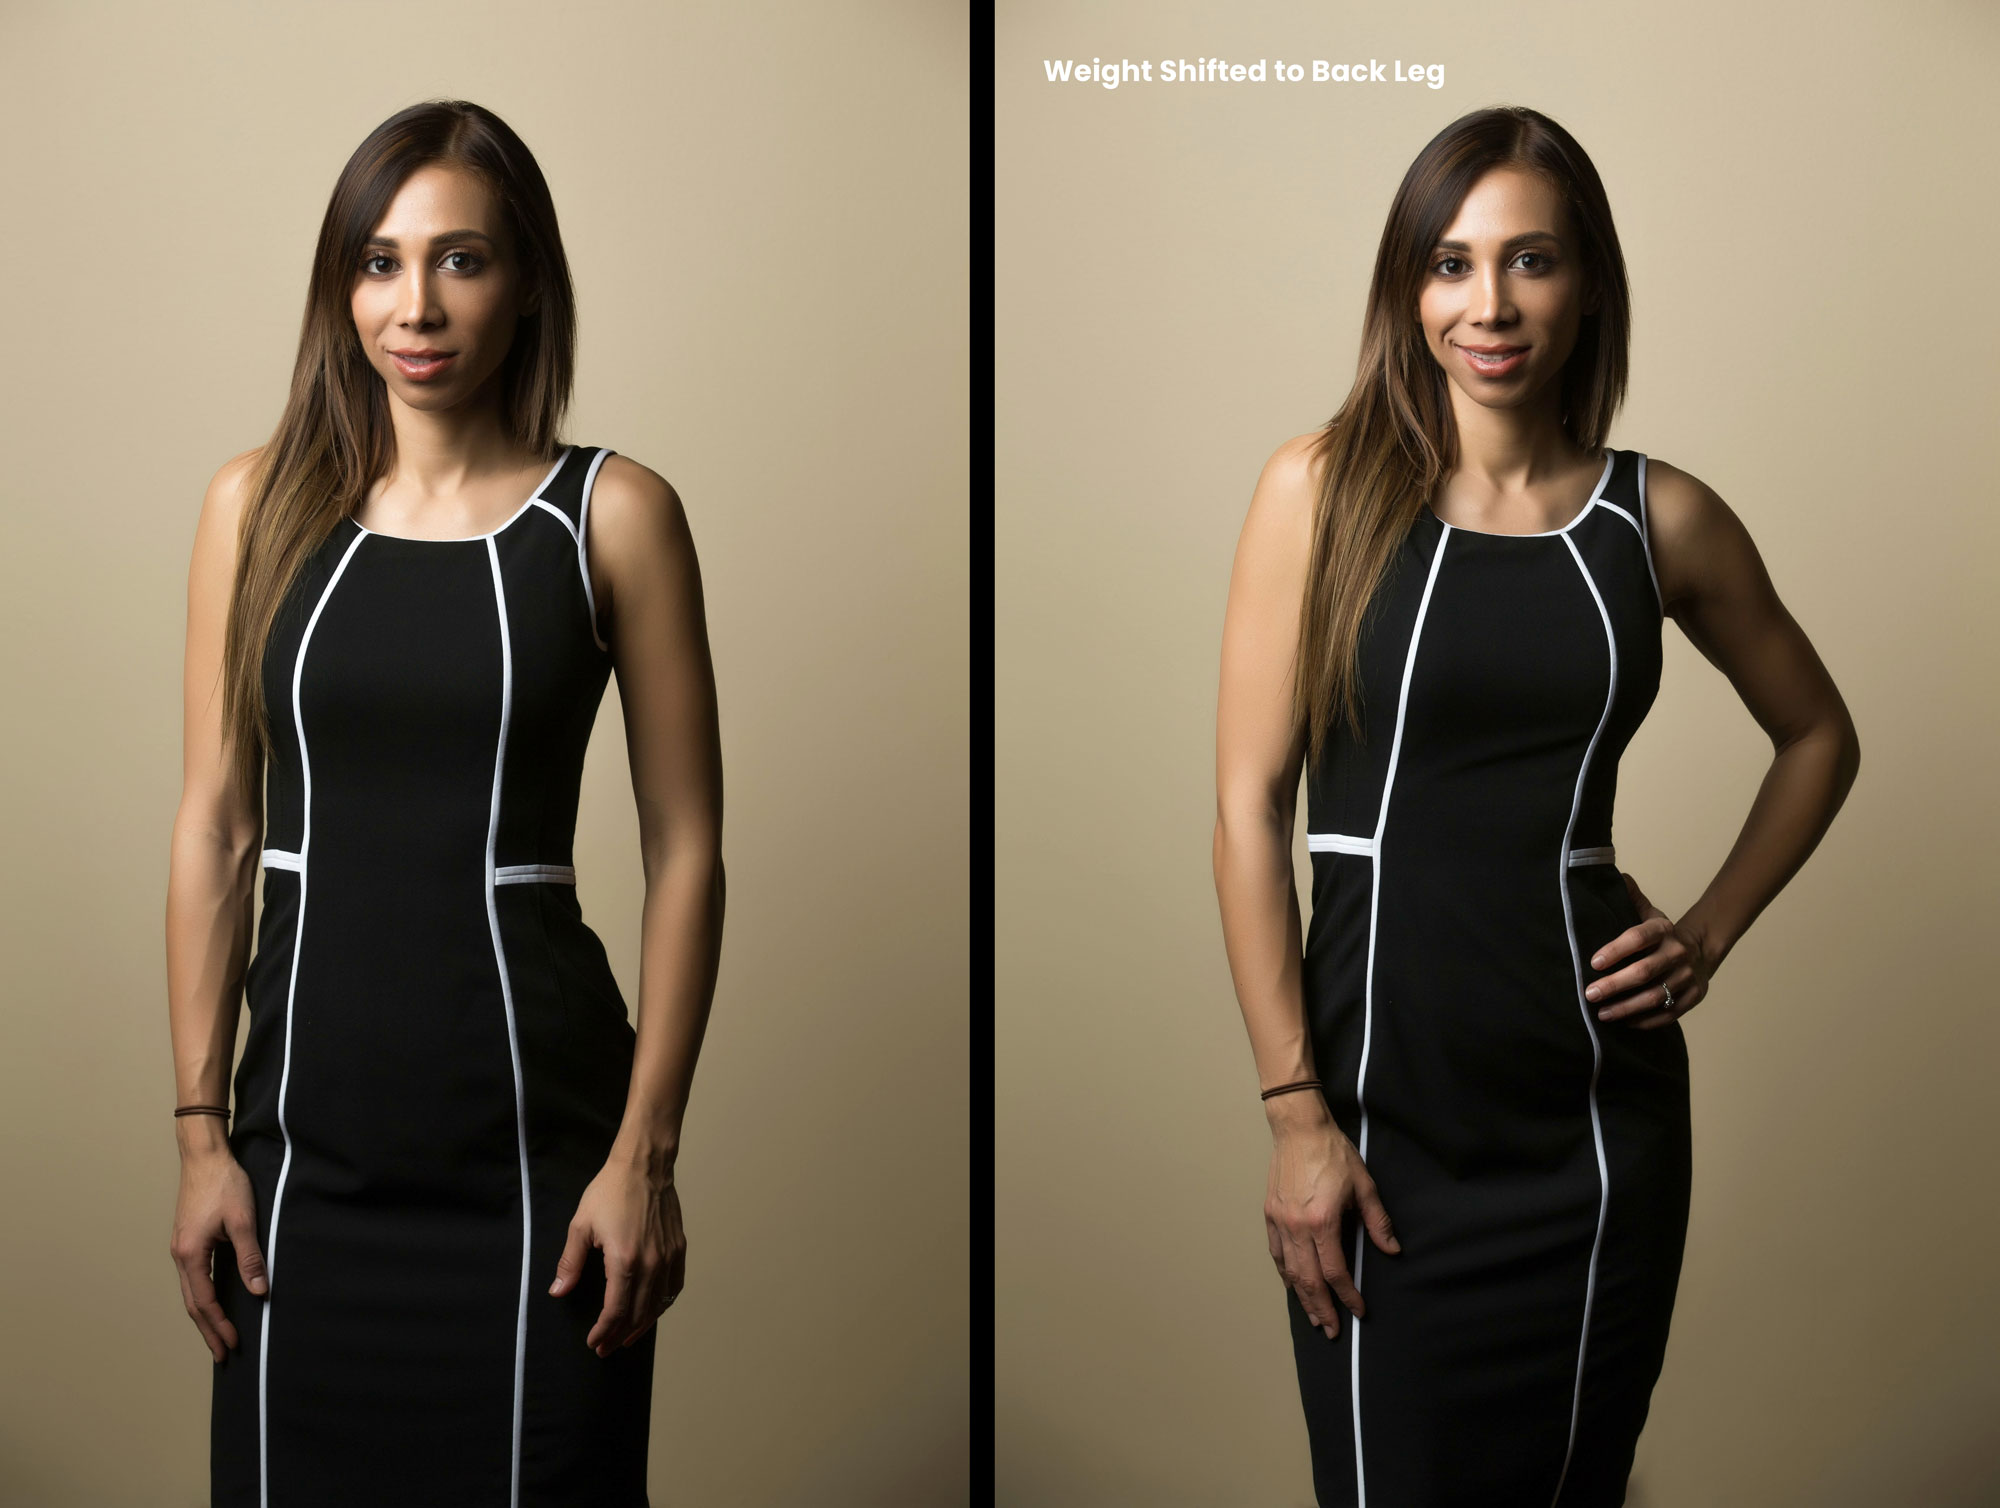
 Next, focus on the lower half by shifting weight
I start all my poses in the same way. When I point the toe toward the camera and have the subject shift her weight to one leg or the other, the subject's pose is complete.
You must remember that posing is about communicating. Shifting her weight from her hip away from the camera will make her backside appear smaller. Most of our clients prefer this technique. However, we often shift weight into the camera when posing boudoir or fitness modeling or other intimate portraiture to create stronger poses or highlight specific parts of the body.
 Turning the client's front leg over the back leg will create an hourglass figure, creating curves on her hips and enhancing her most flattering features.
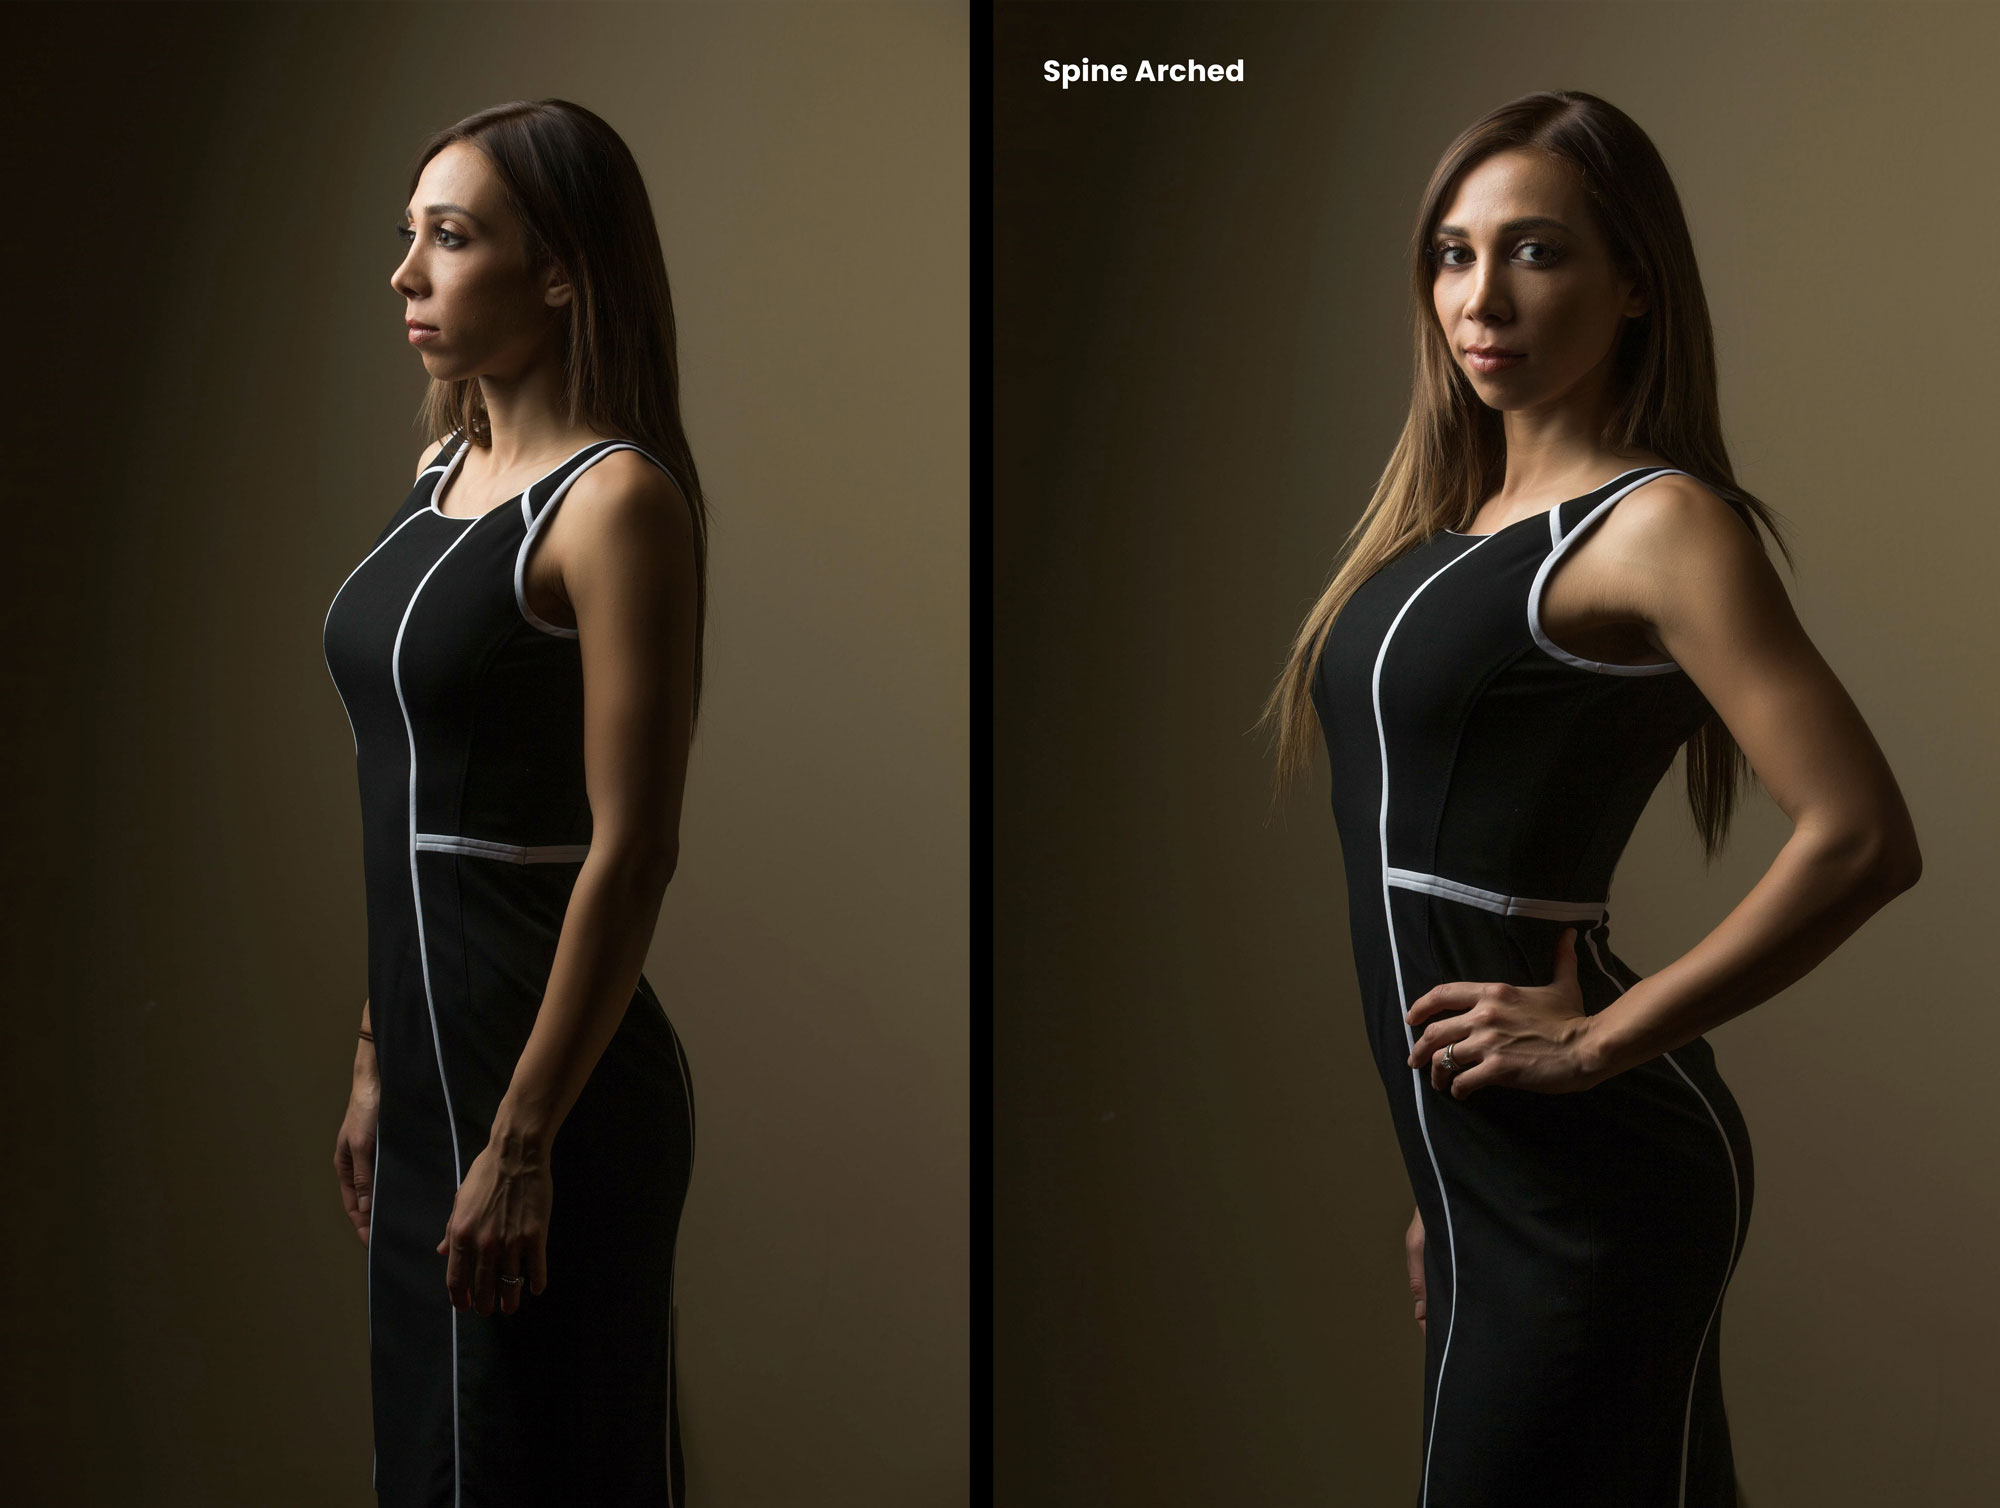
Spine
For a solid foundation pose, the correct posture of the spine is essential. The lumbar spine on a woman should be arched almost always to better emphasize her natural curve. In addition, the chest should be engorged. I will sometimes advise them to bring their shoulder blades too close together in my work with women. After they do so, I will then ask them to take a breath in. Doing so will push the spine even further into its natural arch.
Arms and Hands
Many people tend to find it challenging to position arms or hands, but wedding photographers often have more of an easier time, thanks to brides with bouquets, dresses, or veils to pose with.
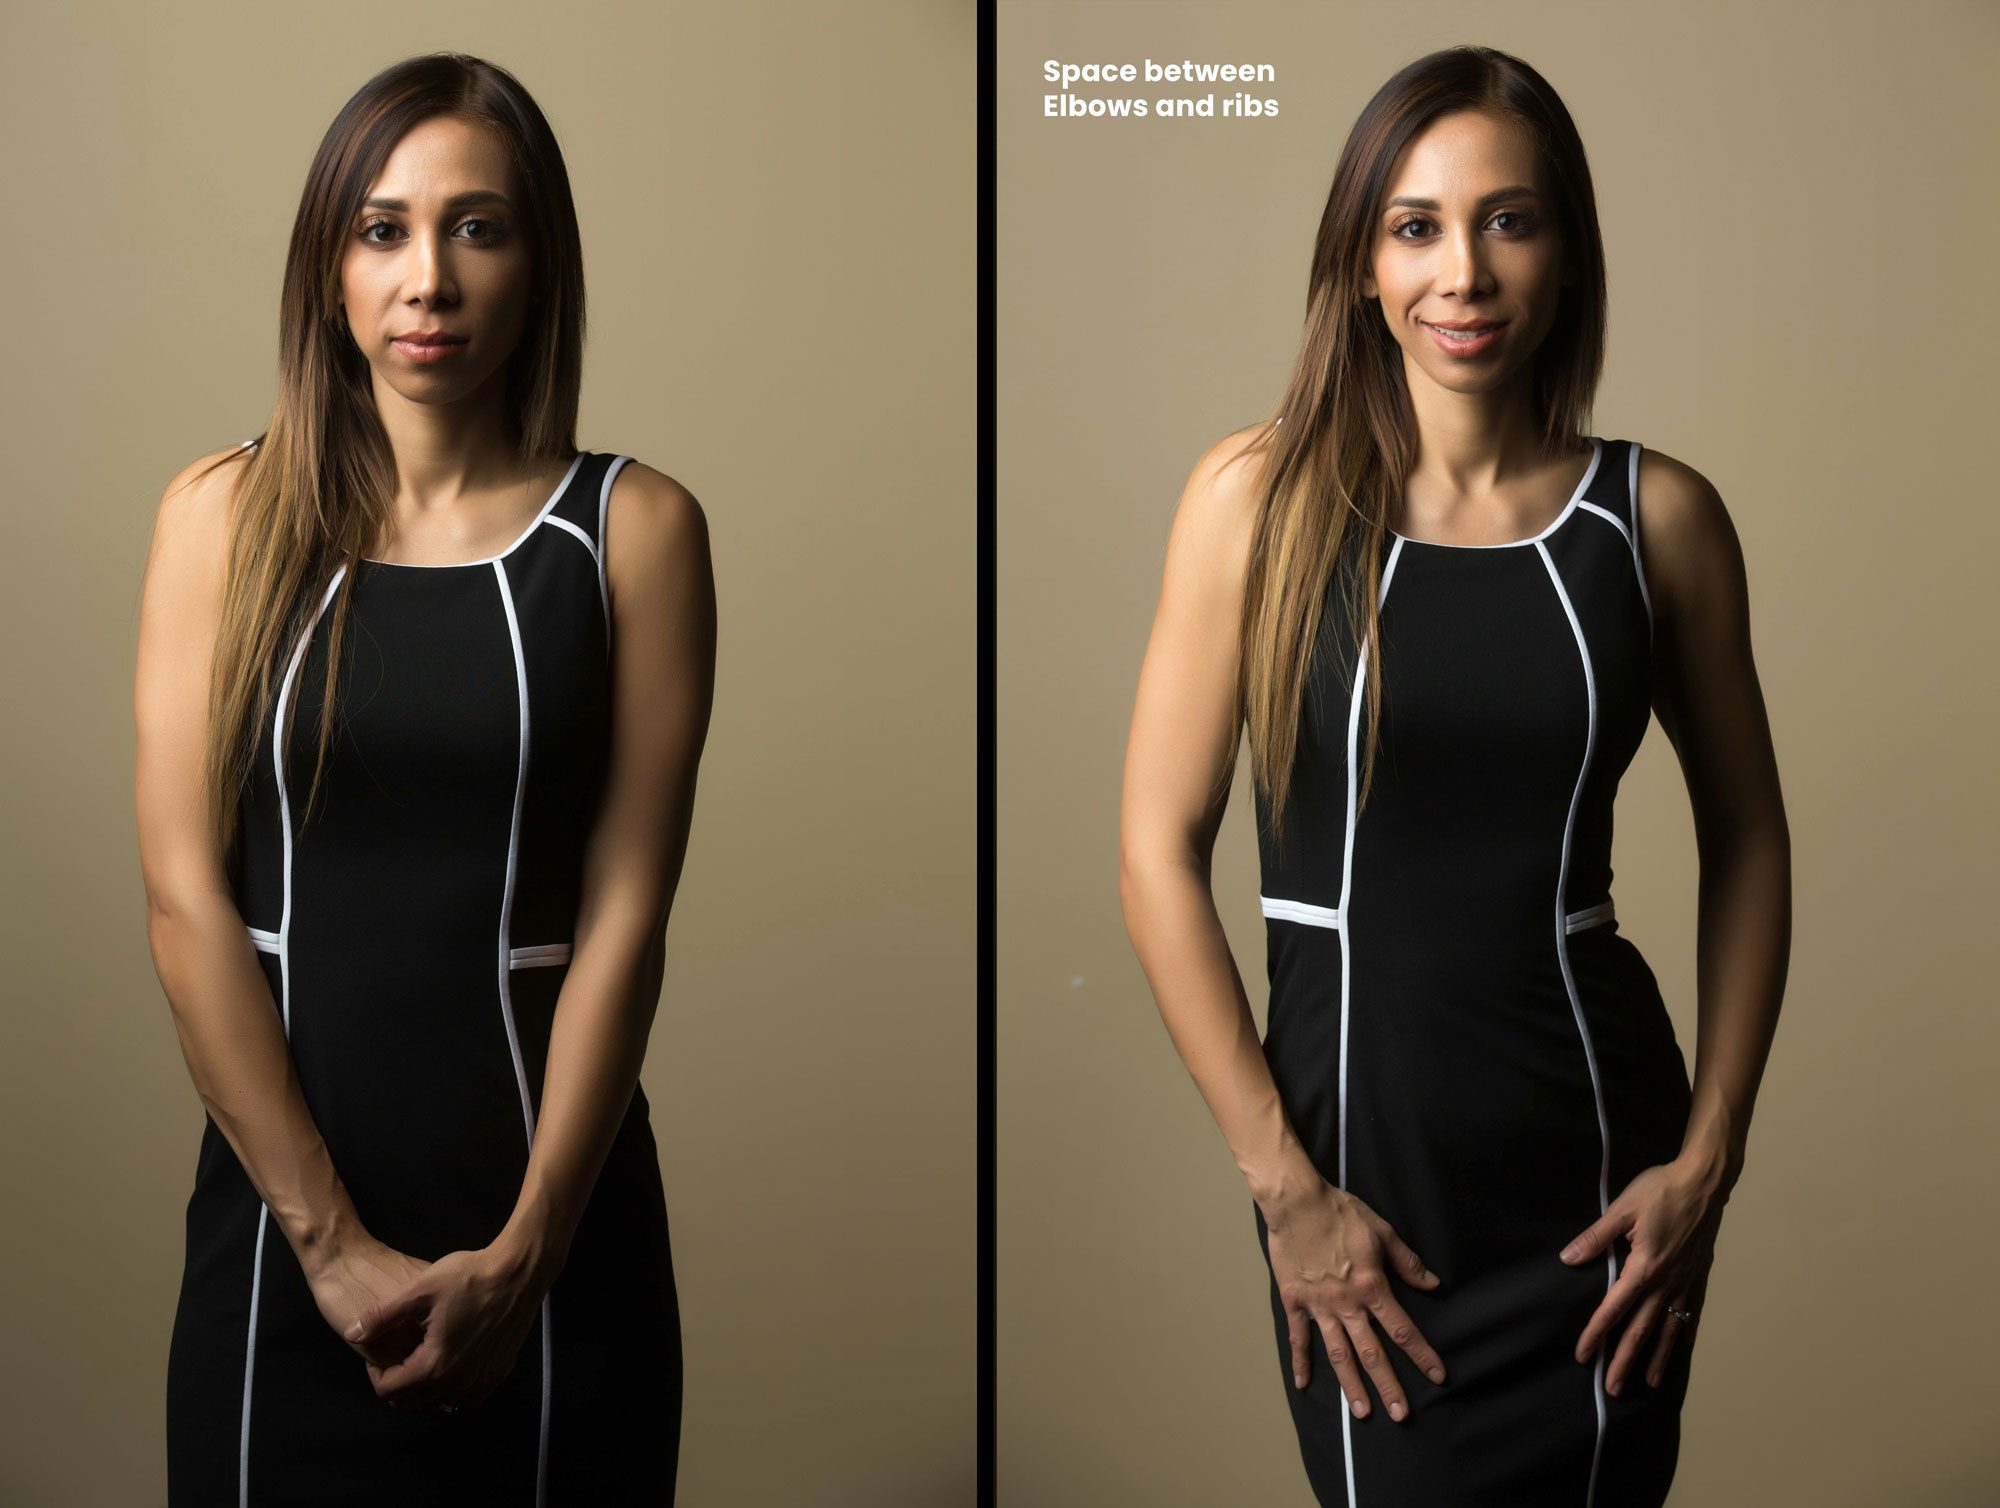
It is essential to understand that to pose arms or hands properly, and they must never hang flat next to the body.
Another rule is that you usually want to leave at least some space between the elbows and the waist whenever you pose close to the side with the arms. This will allow the subject's waist to be seen and prevent the boxy look when the arms cover that area.
 I could probably write an entire article about posing the hands, but remember that we look for graceful and dainty hands in most subjects, especially women. But remember, I'm merely sharing general principles, which can be broken once you learn them.
The subject should turn up her wrist and relax her middle, ring, and pinkie fingers while still keeping her index finger relatively firm. You should get a look like below:
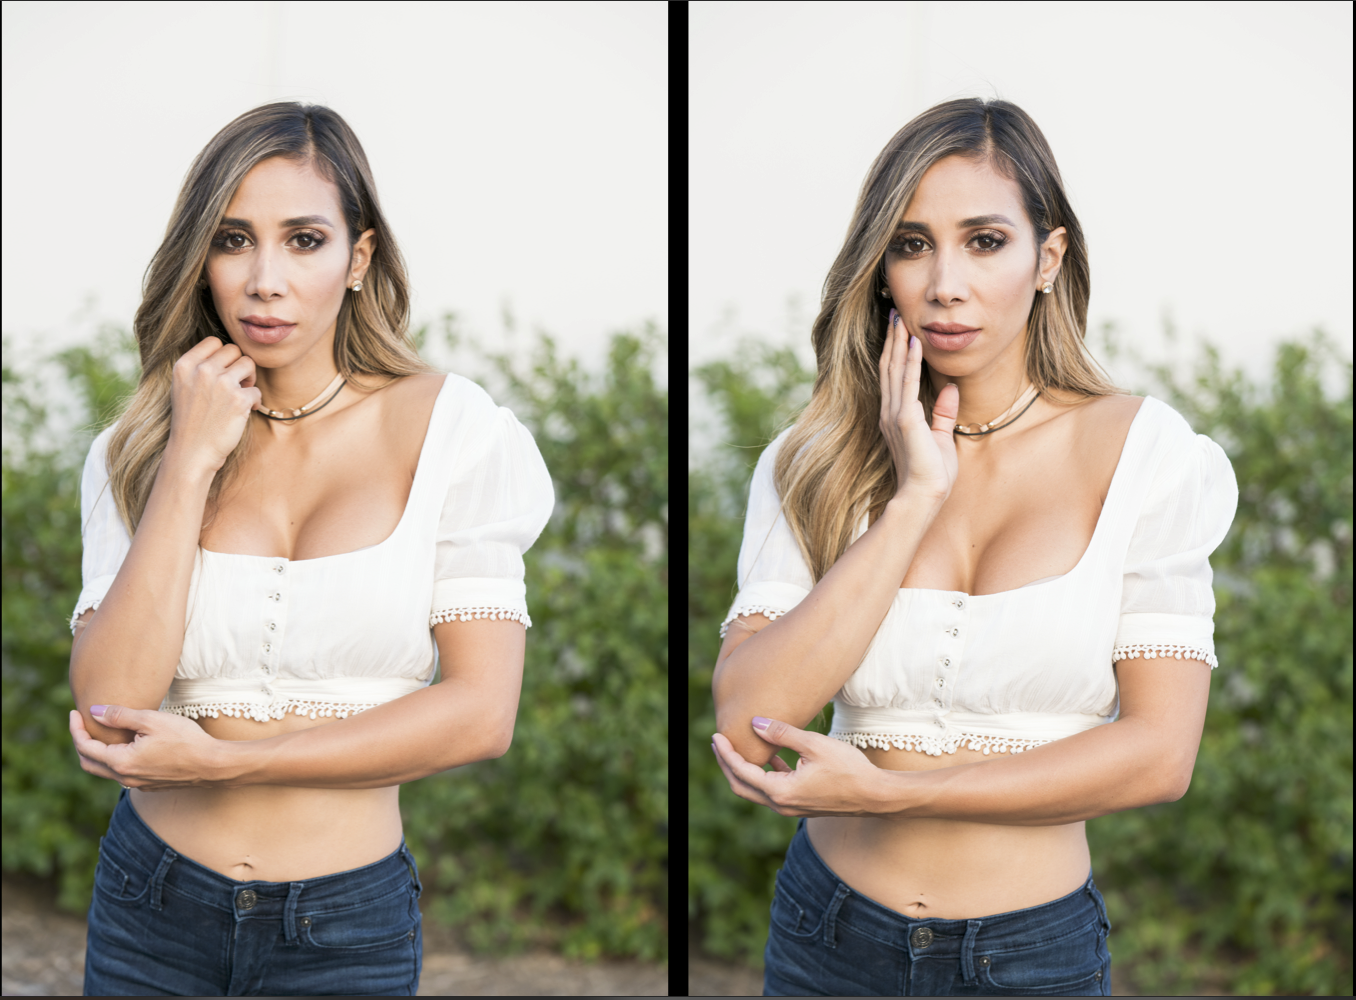
It is essential to pose the hands so they complement the pose and surroundings.
To pose the hands faster, you should simply have them hold on to something by using props. Many times, props are needed to give context to a particular composition. For instance, the bride will typically use her bouquet, veil, or the collar on the groom's jacket.
The side of the hand is a better fit for the female viewer. When you hold your hand as if the palm was toward the camera, you emphasize your masculinity.
Using the arms and hands to create compositions such as triangles or leading lines can grab attention and bring it to the focal point, which is usually the subjects' faces.
Posing the face and expression
Except for hands, the face can be one of the most challenging elements to master. The purpose of posing is to communicate intent, and you can use the face of your subject to engage your audience.
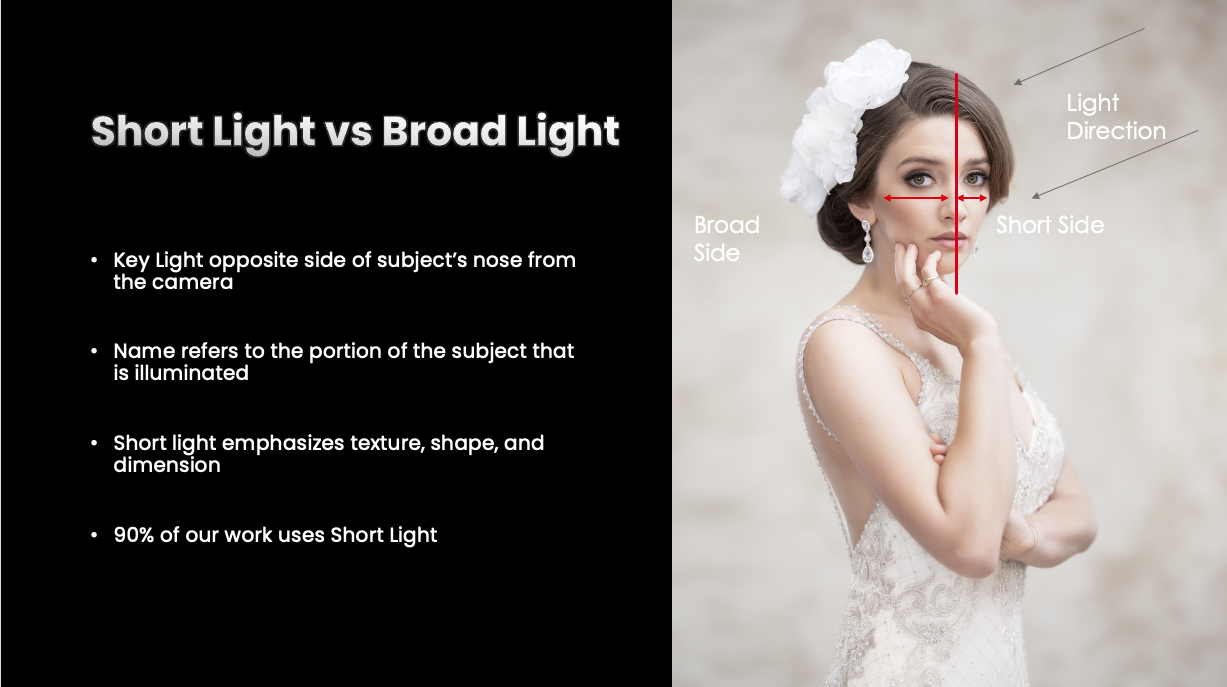
Turn your subjects' backs towards the light when using a foundation posing technique. This way, the light will be cast on the face's shorter side. Females tend to look their best with short sidelight. However, the use of reflectors can help to fill the shadows on the short side. Here is an example of short side light vs. broad sidelight.
Posing the eyes
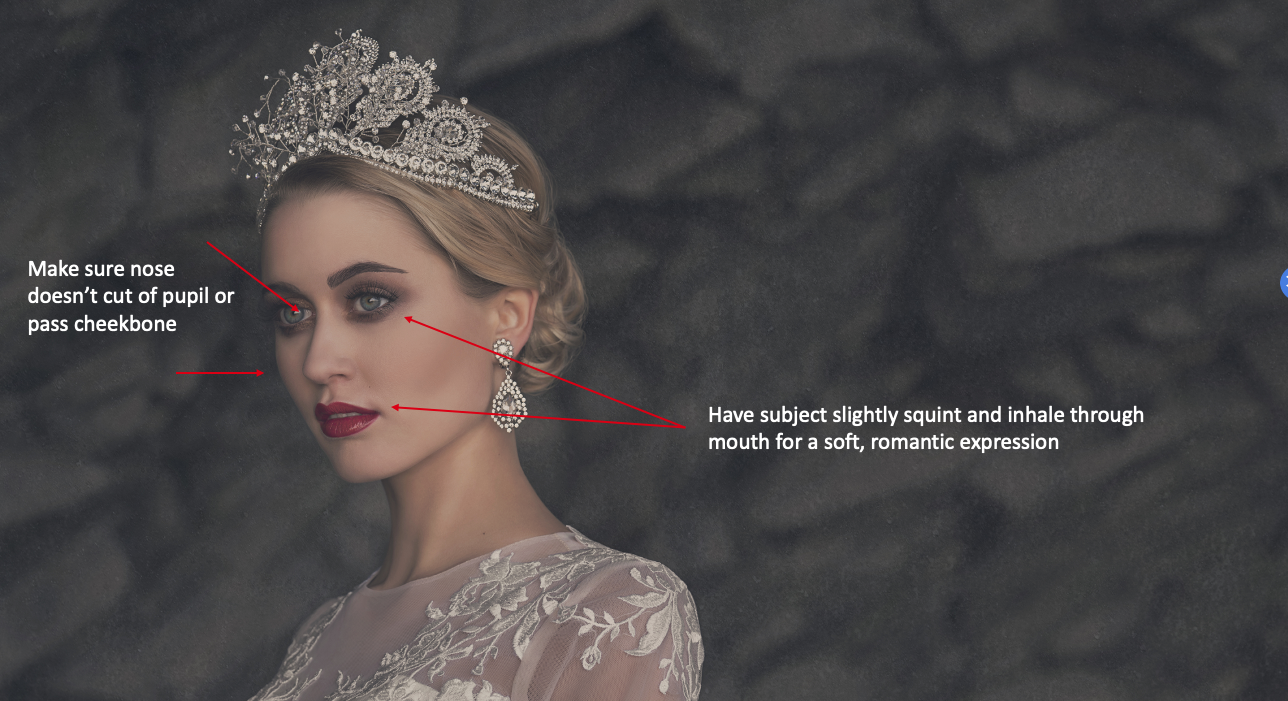
When posing females, we often tweak the camera angle to make the eyes appear more prominent. If you have your subject lean into the distance when fitting hips and legs, you may end up shooting from behind them; by tilting the chin down, the eyes will appear larger.
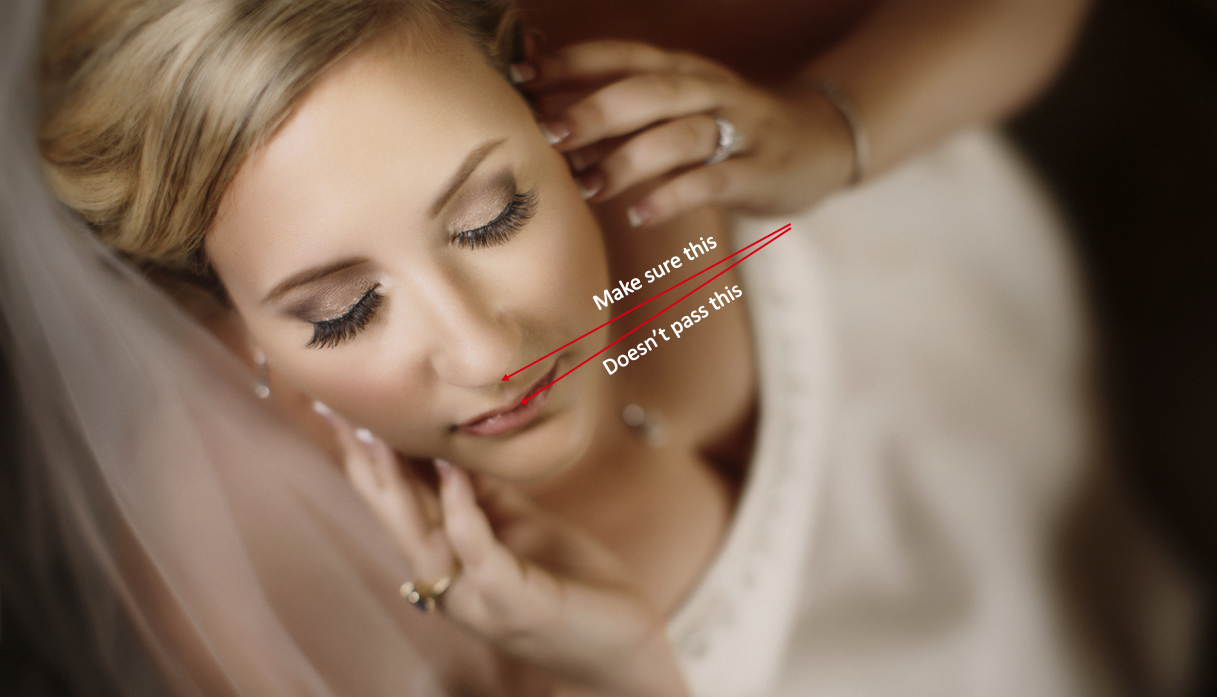
You should keep the subject's nose tip from passing their lips or cheekbones if you have them tilt their head down or to the side. This will make the nose appear more prominent.
Posing Men

This time around, we'll be discussing how to pose a man and a couple as part of my series of posing tips for wedding photographers. In wedding magazines, wedding websites, or other publications, I find that photographers often use the groom merely as a prop.
At consultations, we often joke that we do make sure that the groom is in the book when we go through album spreads. When a couple is just starting their wedding business, a bride wants nothing more than approval from her spouse before making important financial decisions. Brides have told me repeatedly that we were the only photographer they liked out of all of the photographers they interviewed.
Problem Areas
A photographer should pay attention to every part of a woman's body when posing her. The legs, the stomach, the chest, the arms, the chin, and the face are all areas that might pose problems.
In men, the problems are far more limited. The waist-to-chest ratio, double chins, and hairlines are the most common areas for women to be conscious about.
Photographers want to make women--regardless of their frame composition--look slender and petite. However, we want men to look strong. Strength can be emotional or physical, and we can pose men any way we want.
The Foundation
Legs
As with women, we pose men with the same posing foundation we use with women to point one toe at the camera and shift the weight away from the camera. However, we do not need to turn the knee to a narrower angle. We can use a wide or narrow stance with men, but foot placement is essential. I usually position men's feet in front of the camera, with the back leg at a 45-degree angle.
Waist
When it comes to guys, we have to make them look strong and ensure that their chest and shoulder areas are more comprehensive than their waist. The modern embodiment of manliness shows a chest and shoulder area that is broader than their waist. As a result, we want to emphasize the size of the chest in photographs while minimizing the size of the waist. To increase the chest's visibility while deflecting attention away from the waist, simply turn the waist away from the camera, or your subject will feel uncomfortable.
Chest and Shoulders
Getting good photos of men requires us to focus on the chest and shoulders. We have already shrunk the waist by so you can lean forward with his chest. This will distance the waste from the camera, making it look smaller and make the chest seem wider.
In many posing classes, photographers learn that the best way to make their subjects look larger is to have them just lift their shoulders. Where possible, though, I will always tell my subject to keep his shoulders back. As I mentioned, I want the shoulders to look broader, but bringing his shoulders back will emphasize his posture, which is what we want most in portrait and wedding photography.
It is crucial to turn the shoulders toward the camera when adjusting this equation, resulting in a more appealing waist-to-chest ratio. This is a powerful technique, so don't ignore it.
Hands and fingers

Female models are liberated when it comes to posing for photos; they typically are more relaxed. When posing men, however, the tightness will help him to appear powerful.
The hands of the man need to be active in some way. Lots of people place the man's hands in his pocket. I cringe every time I hear a photographer tell a man to leave his thumbs out. We pay attention to skin tones in wedding photography because they feature leading lines, which aren't what we are trying to feature in our pictures. Just remember to tuck that thumb in.
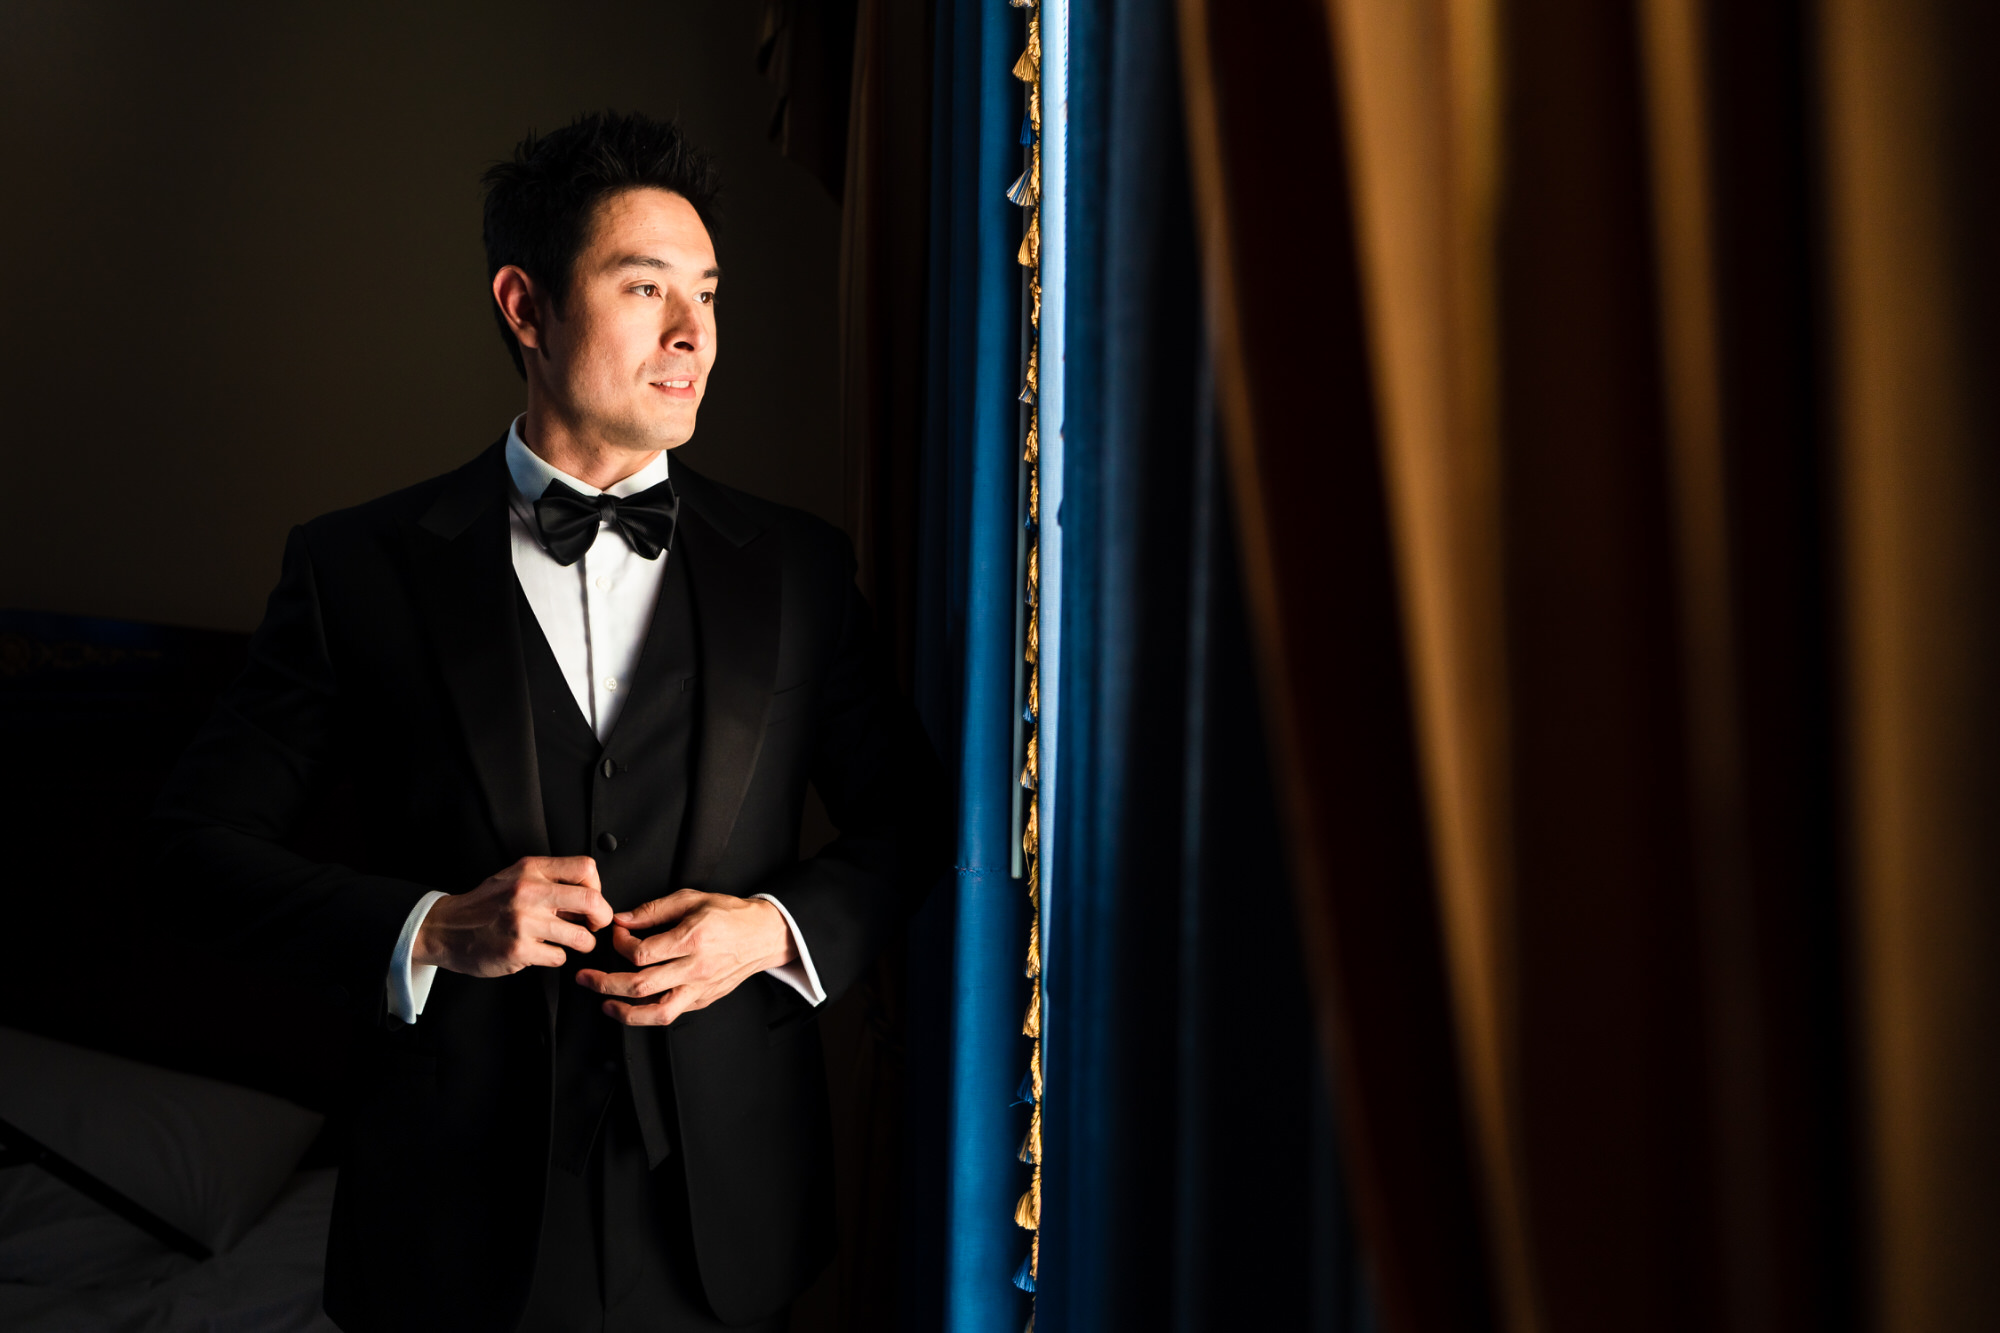
Face and direction of light
A man's face can be lit with almost any type of light to complement his situation. Broad light (lighting the side of the face nearest the camera) effectively emphasizes his strength, while harsh light (lighting the side most distant from the camera) can help create drama. In Hollywood, the split lighting technique, which illuminates one side of an actor's face entirely from the side, can be readily employed to emphasize drama.
Remember to emphasize the jawline by having the subject push his forehead toward the camera. By doing this, you will see more of the jaw and avoid a double chin. Don't forget about cropping! Choose a crop that will fit just above the hairline. Keep your subject's hairline in focus because if you crop too close, his hairline will appear receding. If his hairline is receding, I will crop just above his brow.
Posing Couples
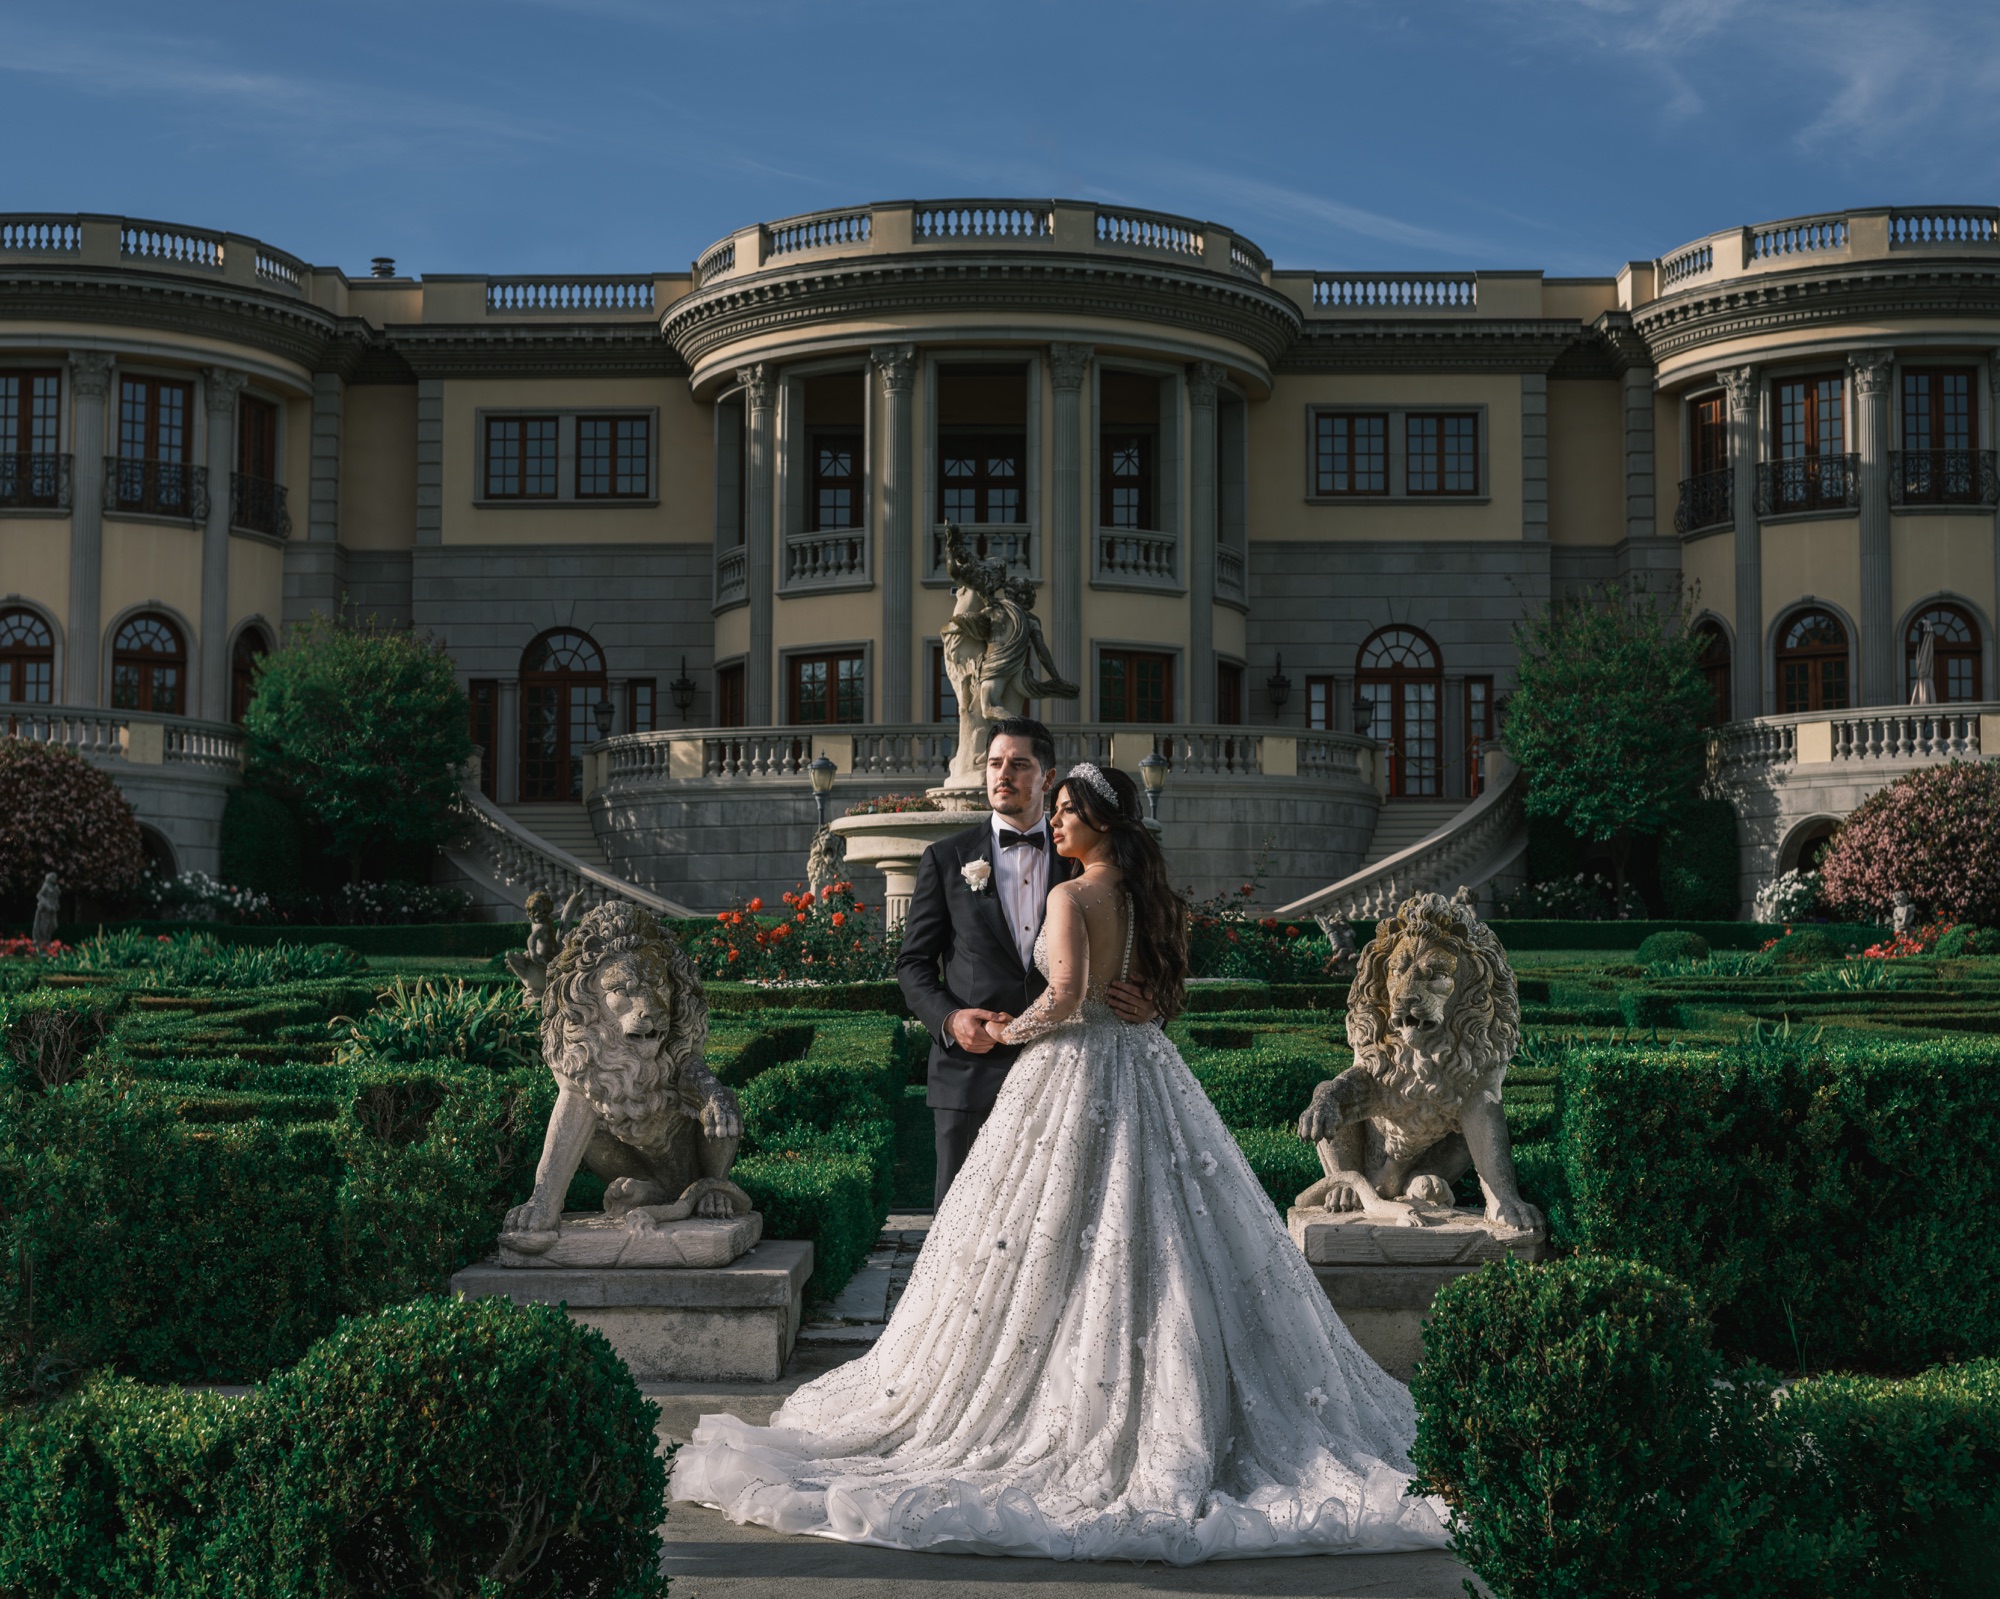
The highest priority of the wedding day is getting your couples creative with your shot combinations. For a style of photography that leans toward art-focused work, this will determine the success and reputation of our clients.
This is my last technical piece of advice, but don't forget: ladies first. Once you understand the technical stuff we have discussed, posing men and women, you have a foundation on which to build your poses.
The rest of this article will provide tips and advice for wedding photographers on the essential part of posing: communication and storytelling. There is only one last piece of advice regarding the technical aspects of posing.
A pose in wedding photography should capture romance, story, and connection. All of your signature images should feature all three elements, and every pose you propose should show one of these elements. If you incorporate all three elements correctly, you will ultimately create a better relationship between the client and their photographs, leading to happy clients and higher sales.
You may not remember this exact detail, but keep in mind that clients will feed off your energy in a shoot, which helps them appear natural and connected in their pictures. If you want them to be natural and connected in their pictures, provide them an experience they will never forget.
Romance
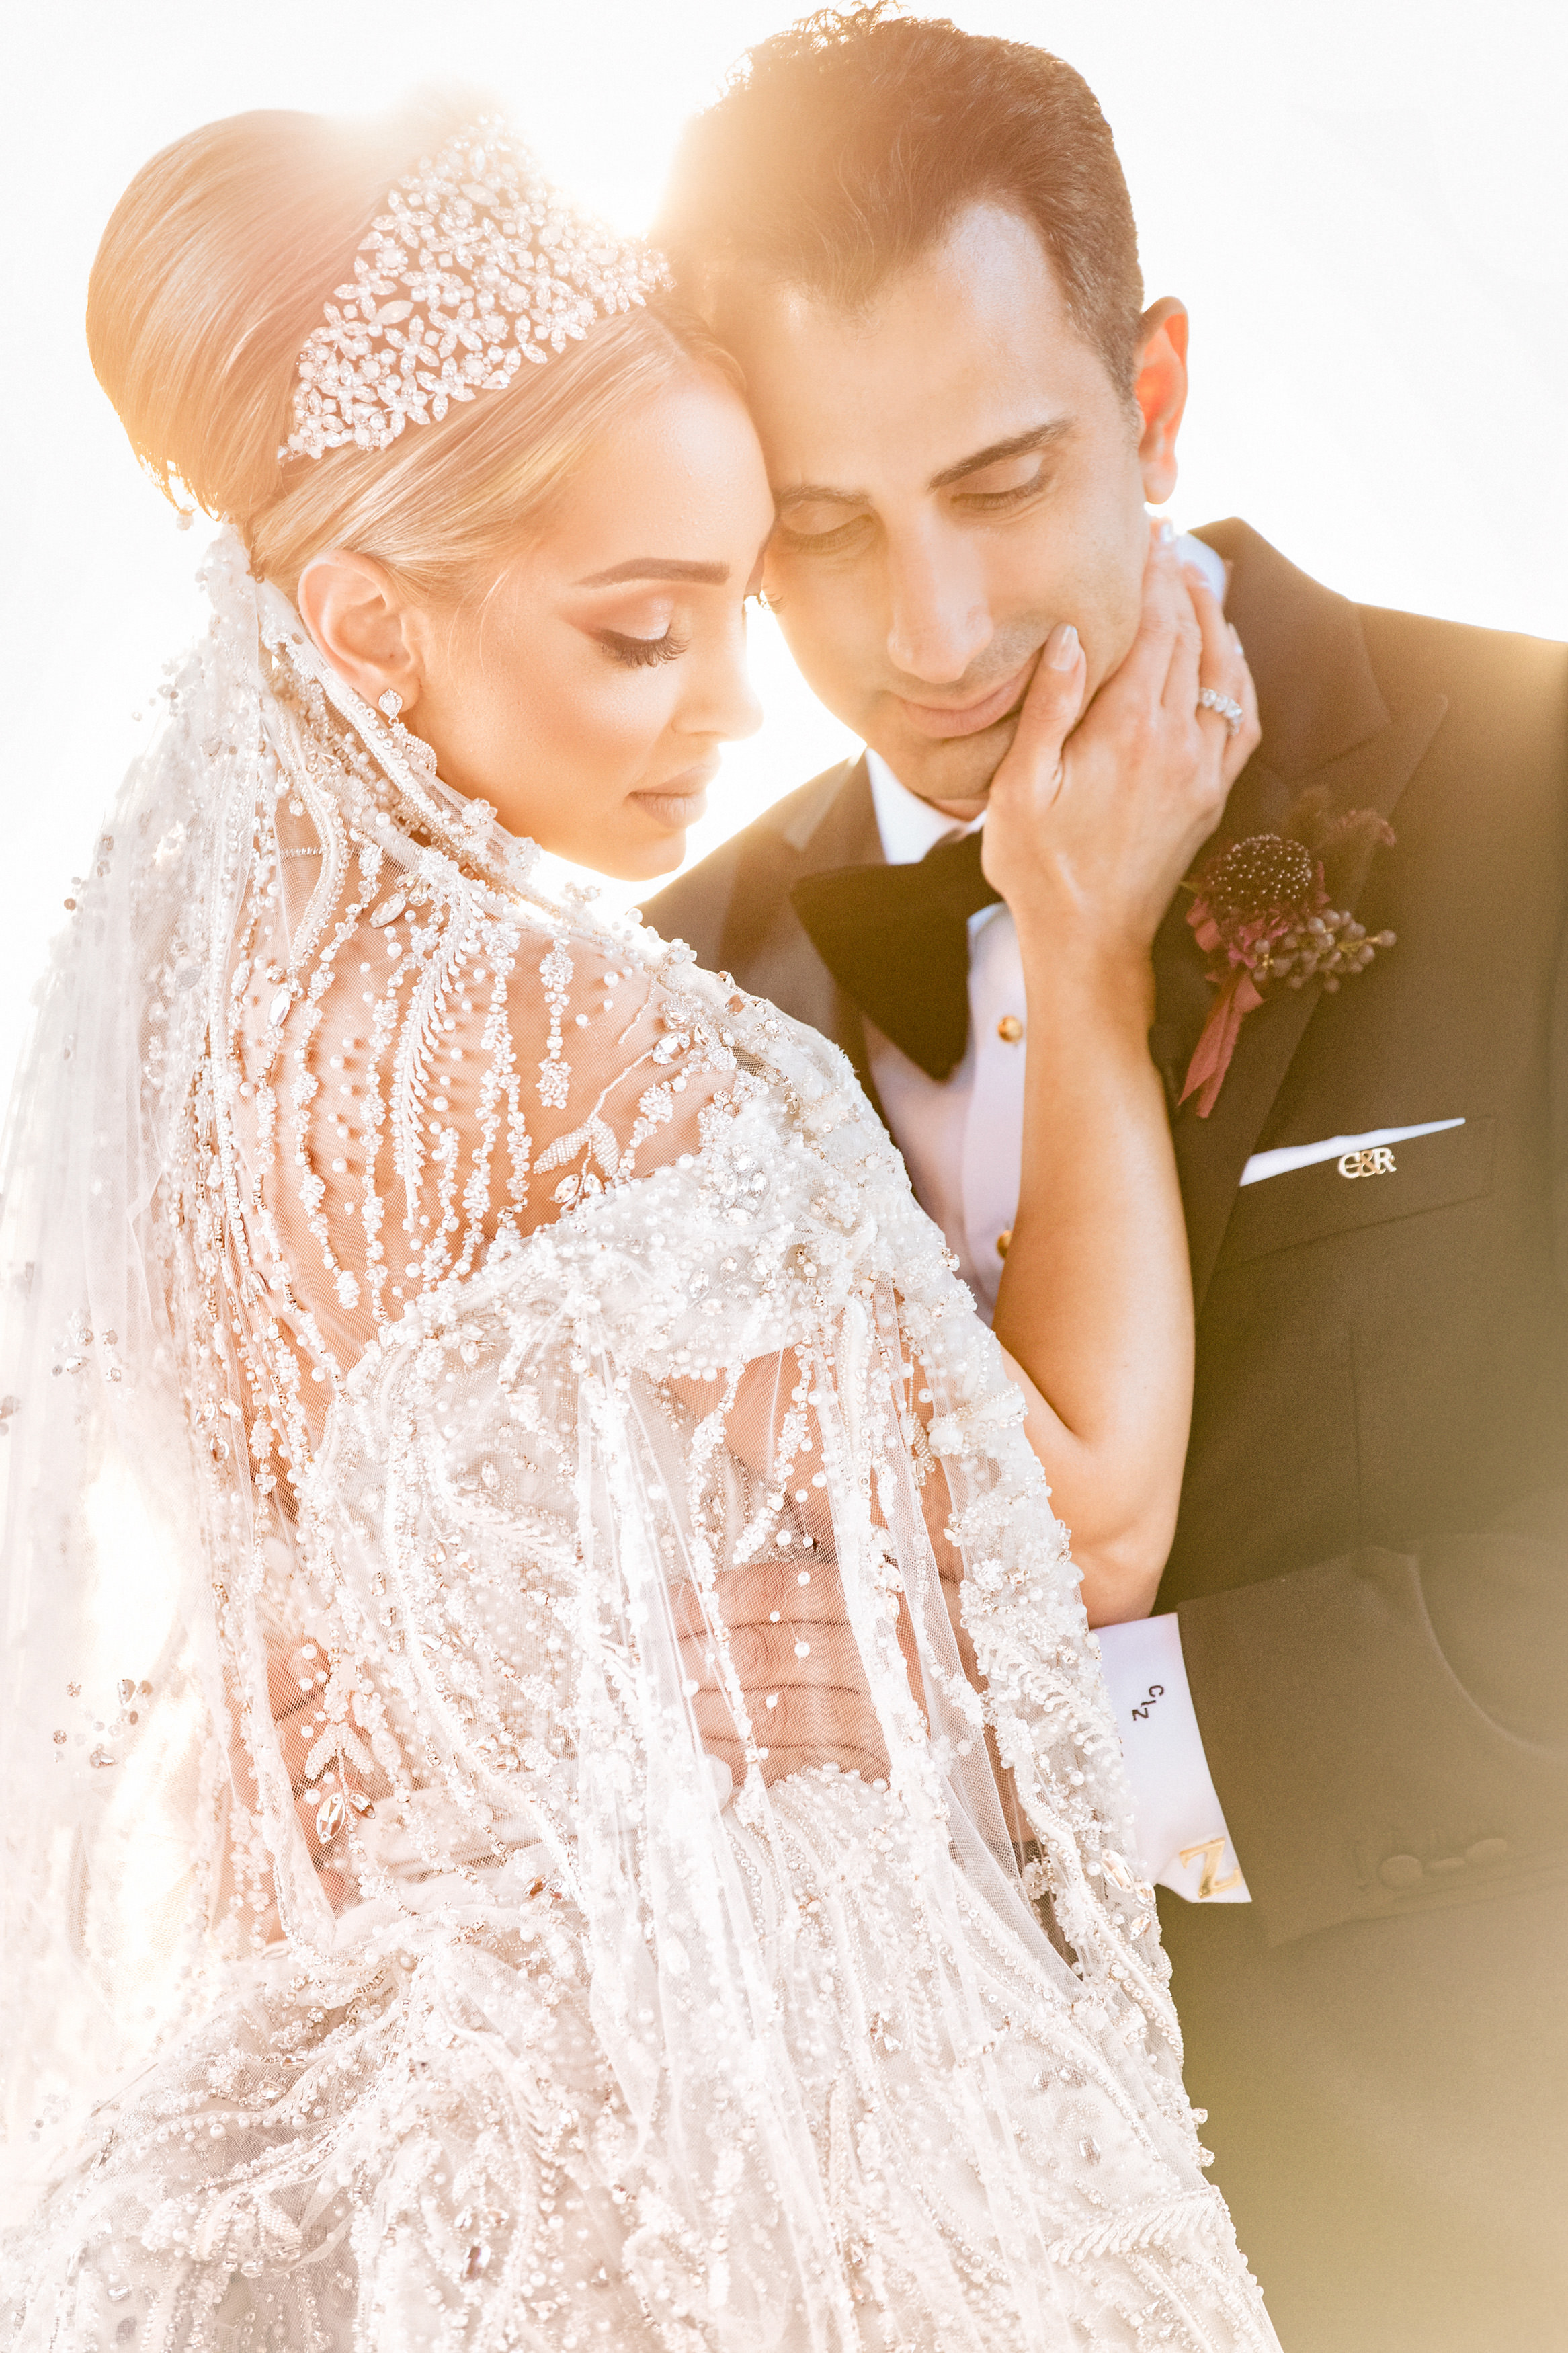
A romantic portrait can be bright and airy or dark and dramatic, depending on your aesthetic. To translate romance, you must gain your couple's trust and build a relationship with them.
I recommend couples taking candid portraits to convey romantic commitment. Put them in scenarios where they interact with one another rather than looking straight at the camera. Make sure you shoot various angles so you can develop a natural feel while keeping the focus solely on the couple together.
I am not entirely against taking shots of the couple kissing. However, don't overdo it in their gallery. Often it's best to take images where the groom kisses the bride as she stands or his lips brushing her shoulder. If you prefer, you can ask the couple to "almost kiss" as I think the anticipation in the photo portrays romance better than a kiss.
Connectedness
It's essential to show connectedness in an image of a couple. Technical flaws can make it hard for a photographer who has insufficient experience to do so. Posing is about communication. Your communication should be consistent throughout the entire image.
An image that fails to communicate connectedness is often defined by hand placement, but another culprit is expression. Have you seen images in which each person's eyes are closed while kissing? I know, it's creepy.
Another problem that I frequently see with couples is that they will often pose too far apart. Couples should be situated so that their distance between each other is minimal, except in silhouettes, where we want to show the body's outline.
Get to know your couple, so you know how to demonstrate their love for each other.
Story and motion posing
Creating a story through wedding portraits is an important aspect that is often neglected. It is easier to tell a story when it occurs naturally during a ceremony, but photographing portraits requires that we create a story. Telling an engaging story with your photographs can help you sell your albums and wall art later and give you helpful ammunition at a sales meeting when you are trying to convince a client to purchase multiple pieces of artwork to display as a collection together.
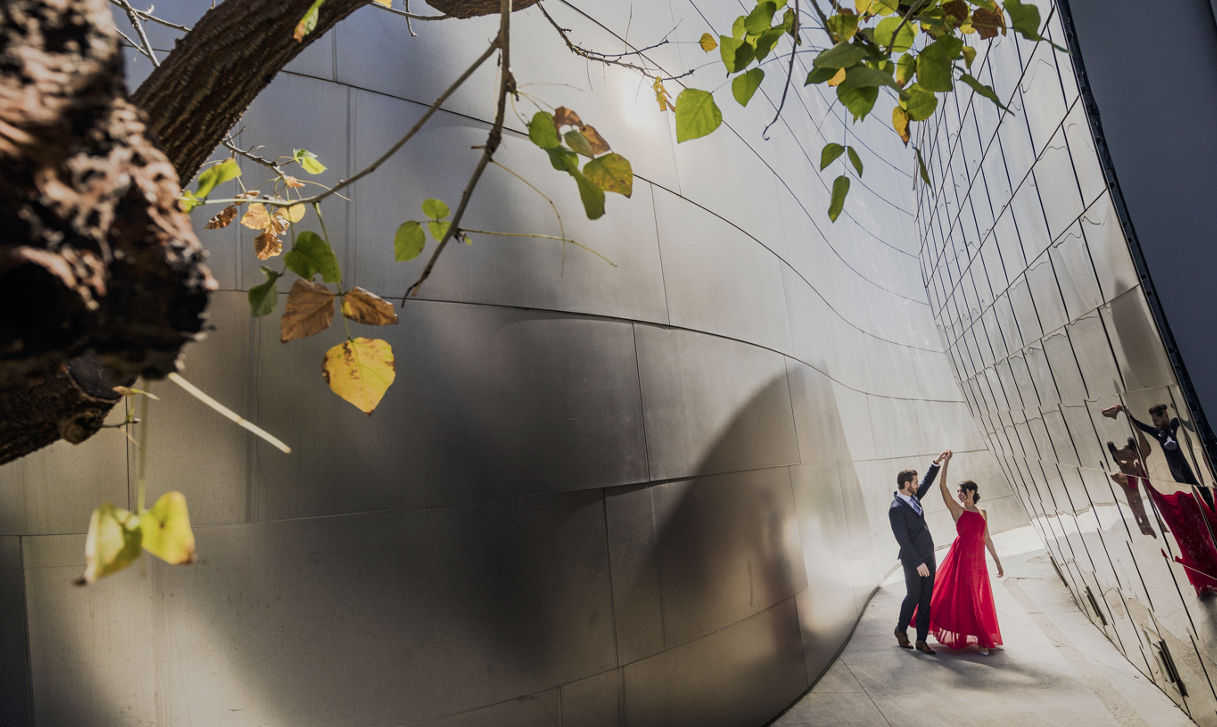
Among the storytelling techniques, I love most is motion posing. With motion posing, the couple can appear seamless because they can feel relaxed and free. They are also inspired to have fun, which creates a lasting sense of connectedness and romance in the photographs taken.
I use this technique on every shoot, and it's a hit. I use it multiple times to get the shot just right. This is the cure for stiff couples who are hard to put at ease.
Among the three elements of successful communication, the story plays the most crucial role.
Putting it all together
Being able to pose effectively for a portrait photographer is one of the most challenging things to learn. Posing can be the difference between your clients being satisfied or loving their images. To do this effectively, you need to first understand the foundations of posing. After you have the foundations in place, you can move on to experimenting with new ideas and poses. You won't ever run out of posing ideas if you know how to communicate with your viewers right from the start. You'll create images that describe your style and ultimately create a steady stream of clients as you combine all of the elements of effective communication to make your business stand out.
